Jeff’s office just got a new upgrade! 🤩 I got Jeff’s office just got a new upgrade! 🤩 I got him the new @tcl_usa F8D Fire TV cause a guy cant have too many screens 😂 This TV uses QLED technology and has 4K Ultra HD resolution and is available exclusively on Amazon. Comment SHOP for a link to everything! #tclpartner
Did you know you can just…trace onto canvases?! Did you know you can just…trace onto canvases?! 🎨 I was soo close to spending $8 per character canvas on Etsy until I learned that I could transfer printed designs onto blank canvases myself!

Between me and Jeff, we traced 30 Hello Kitty canvases in under two hours while watching Married at First Sight Seattle 😂 It was actually kinda fun and saved us $200!

Comment SHOP and I’ll send you the transfer paper and canvases I used + easy DIY instructions ❤️ #canvaspaintings #kidspartyideas #kidscraft
Had to share one last recap of my parents’ 50th Had to share one last recap of my parents’ 50th wedding anniversary party because that clip of them dancing and my dad dancing with my daughters will forever be one of my favorite memories 🥹

My parents fled Vietnam in 1975 after the war ended. When they arrived in Washington to meet their sponsors, my dad happened to see my mom and aunt at the airport struggling and not knowing any English. He stepped in to help them then pursued my mom for the next six months. They got married shortly after in 1976 and the rest is history!

As recent refugees starting over in a new country, they didn’t have much money, so they had a small, simple wedding. That’s why I knew I wanted to make their 50th anniversary party extra special and give them the beautiful celebration they never had. Happy 50th anniversary to my parents!! ❤️🥂 #50years #anniversaryparty
DIY MARQUEE SIGN! 💡 This is my second time buyi DIY MARQUEE SIGN! 💡 This is my second time buying this kit and it’s so easy to make this marquee sign, just snap and hot glue! You can choose any number or letter for your party. This is the 3-foot option. Comment SHOP for the link! #amazonfind #marqueenumbers
AMAZON HOSTING HACK 🤍 To get the draped table l AMAZON HOSTING HACK 🤍 To get the draped table look, use these backdrop curtain drapes! I’ve already washed them and they came out looking clean and new still. Excited to use them for an actual backdrop too. Comment SHOP for the exact link! #hostinghack #tablesettingideas
My favorite part of decorating for a party is putt My favorite part of decorating for a party is putting together the table setting! This one turned out so elegant and timeless 🤩🤍 I’ll share what I used for the draped, pleated look in another video. Comment SHOP for all the links to my parents’ wedding anniversary party decor! #tablesetup #anniversaryparty #tablesettingideas
Party prep for my parents’ 50th wedding annivers Party prep for my parents’ 50th wedding anniversary! 👰🏻‍♀️🤵🏻‍♂️💍 This was such a big milestone that I wanted to go all out for the party decor 🤍 My parents met shortly after coming to America when the Vietnam War ended and got married within 6 months. 50 years later and here we are 🥹 If you want any decor links, just comment SHOP!  #weddinganniversary
Can’t believe we installed this pergola ourselve Can’t believe we installed this pergola ourselves! We have a friend that paid $1500 to get it installed so we were afraid it was going to be a lot of work. But it was pretty straightforward and everything came packaged nicely and organized. We finished the pergola itself in 4 hours!

Once we had it bolted down by our concrete guy, we added the accessories. Should I fully enclose this @miradoroutdoor pergola with two more pull down screens on the sides?! Comment SHOP for the pergola link and use code TINA05 for an extra 5% off! #pergola #miradorpergola #moretoenjoy
BACKYARD MAKEOVER PART 3! We made it to the final BACKYARD MAKEOVER PART 3! We made it to the final reveal! We ripped up some muddy grass, poured concrete, dug up and moved our irrigation system, planted a ton of trees and hydrangeas, and put up a new pergola. This project was 1.5 months in the making and it feels amazing to be finished. We are already hanging out here so much more and the concrete really makes the space more usable.

If you’re looking for my @miradoroutdoor pergola, it’s is currently 30% off for early Labor Day weekend sale and you can use my code TINA05 for an extra 5% off 🤍 Comment SHOP for all the links and I hope you enjoyed this backyard makeover series! #backyardproject #miradorpergola #moretoenjoy #outdoorpatio
  • About
  • TikTok
  • My Amazon Page
  • My LTK
  • Lifestyle
    • Beauty + Hair
    • Career + Finance
    • Culture
    • Food + Recipes
    • Travel
    • Wedding
    • All
  • Home
    • DIY
    • Entertain / Parties
    • Home Decor
    • Organization + Cleaning
    • All
  • Motherhood
    • Maternity Outfits
    • Pregnancy + Postpartum
    • Baby 0-12 months
    • Toddler
    • All
  • Fashion
    • Fall / Winter Oufits
    • Spring / Summer Outfits
    • Maternity Outfits
    • All
  • Shop + Links
    • My Instagram / TikTok
    • My Amazon Page
    • My Home
    • My Favorite Retailers
  • Contact
    • About
    • Contact Me
    • FAQ

Just A Tina Bit

A Seattle Lifestyle Blog

  • Lifestyle
    • Beauty + Hair
    • Career + Finance
    • Culture
    • Food + Recipes
    • Travel
    • Wedding
    • All
  • Home
    • DIY
    • Entertain / Parties
    • Home Decor
    • Organization + Cleaning
    • All
  • Motherhood
    • Maternity Outfits
    • Pregnancy + Postpartum
    • Baby 0-12 months
    • Toddler
    • All
  • Fashion
    • Fall / Winter Oufits
    • Spring / Summer Outfits
    • Maternity Outfits
    • All
  • Shop + Links
    • My Instagram / TikTok
    • My Amazon Page
    • My Home
    • My Favorite Retailers
  • Contact
    • About
    • Contact Me
    • FAQ

Baby 0-12 months, DIY, Home, Motherhood · April 11, 2022

DIY Photo Board Tutorial

I recently shared this post about Olivia’s boba themed first birthday. I spent a lot of time on the decor, but especially this DIY photo board of her first year. It’s one of my favorite party decorations because it’s something I’ll keep and look back on of her first 12 months of her life. I’m sharing step-by-step instructions on how to create one yourself. You can make this for birthday parties, showers, or weddings!
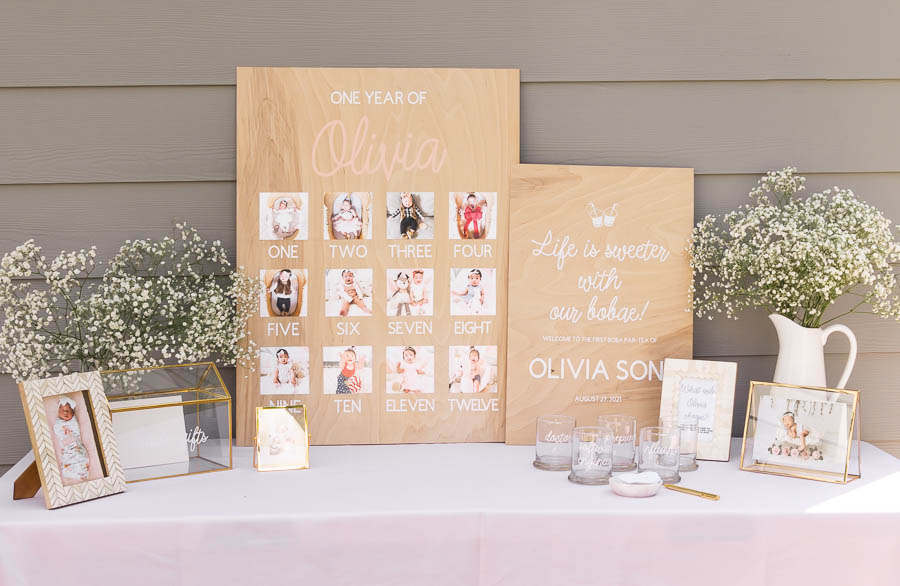
DIY photo board tutorial, DIY one year old board, 12 months of Olivia one year board, Cricut vinyl DIY project

Supplies You’ll Need:

1 2×4′ Project board
Cricut machine
Removable vinyl or custom labels
Transfer tape
12 4×4″ or 5×5″ photos (Walgreens or Costco)
Pencil
Ruler leveler
Elmer’s glue

How to Build the Photo Board:

Step 1: Gather supplies
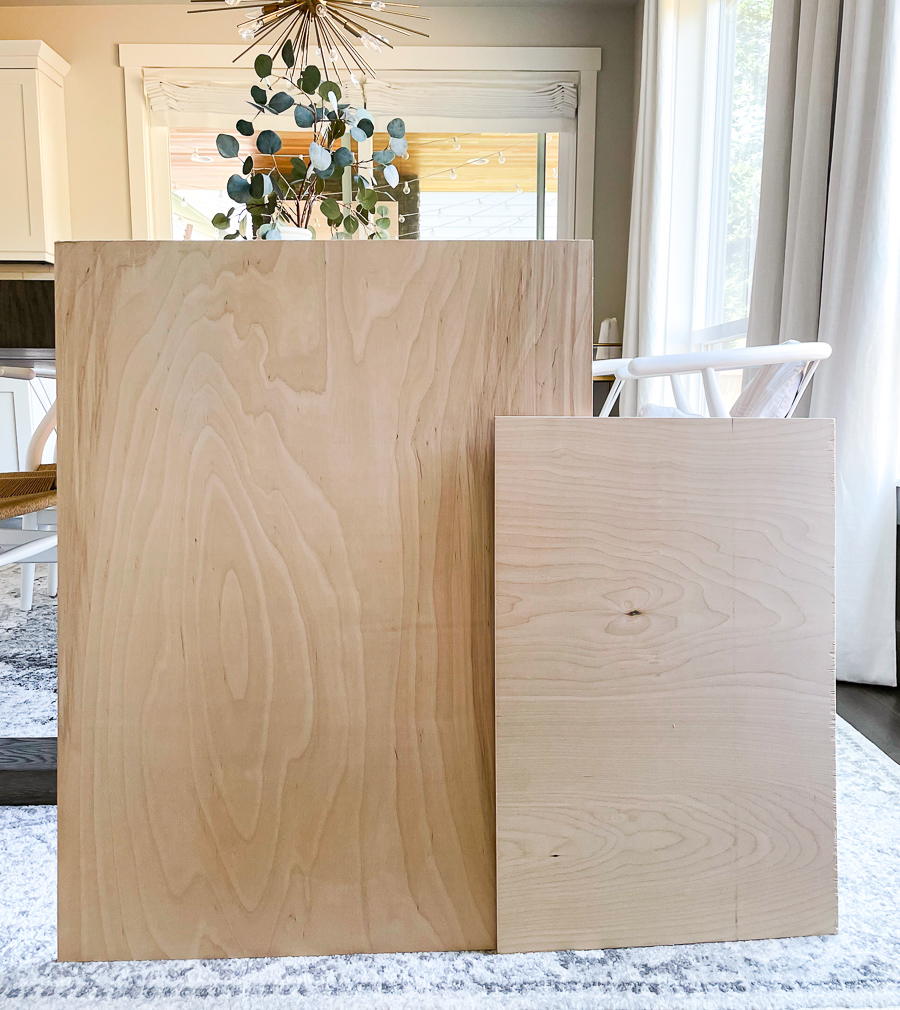
Project board from Home Depot

I shared the supplies you’ll need above but below are some more details about what board I got and where you can print square photos.

I purchased the 2×4′ project board from Home Depot as the base for the photo board. You can ask Home Depot to cut the board smaller. Since we have a circular saw, we made our own cut and used the smaller piece to make a welcome sign.

You’ll also need to get photos printed in advance. Since this is a one year photo board, I printed out 12 4×4″ photos from Walgreens, each photo from her first 12 months! Costco also has 5×5″ photos but they can only be mailed to you so be sure to order those ahead of time.

Step 2: Cut or purchase vinyl labels
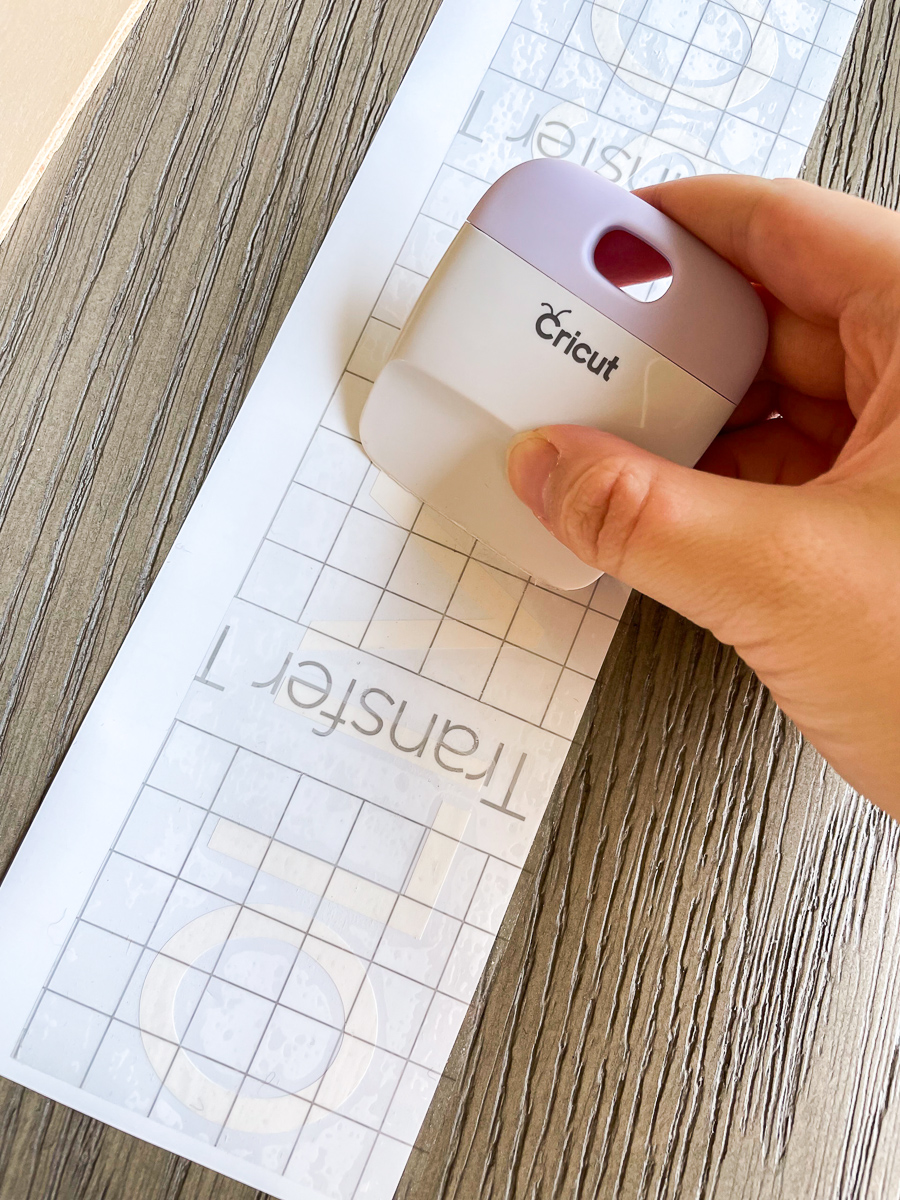
Cricut vinyl and transfer tape

I made labels of Olivia’s name at the top and then month labels under each photo using removable vinyl and a Cricut machine. If you don’t have a Cricut, you can purchase custom vinyl labels from Etsy.

Step 3: Plan the layout
DIY one year old board, 12 months of Olivia one year board, Cricut vinyl DIY project

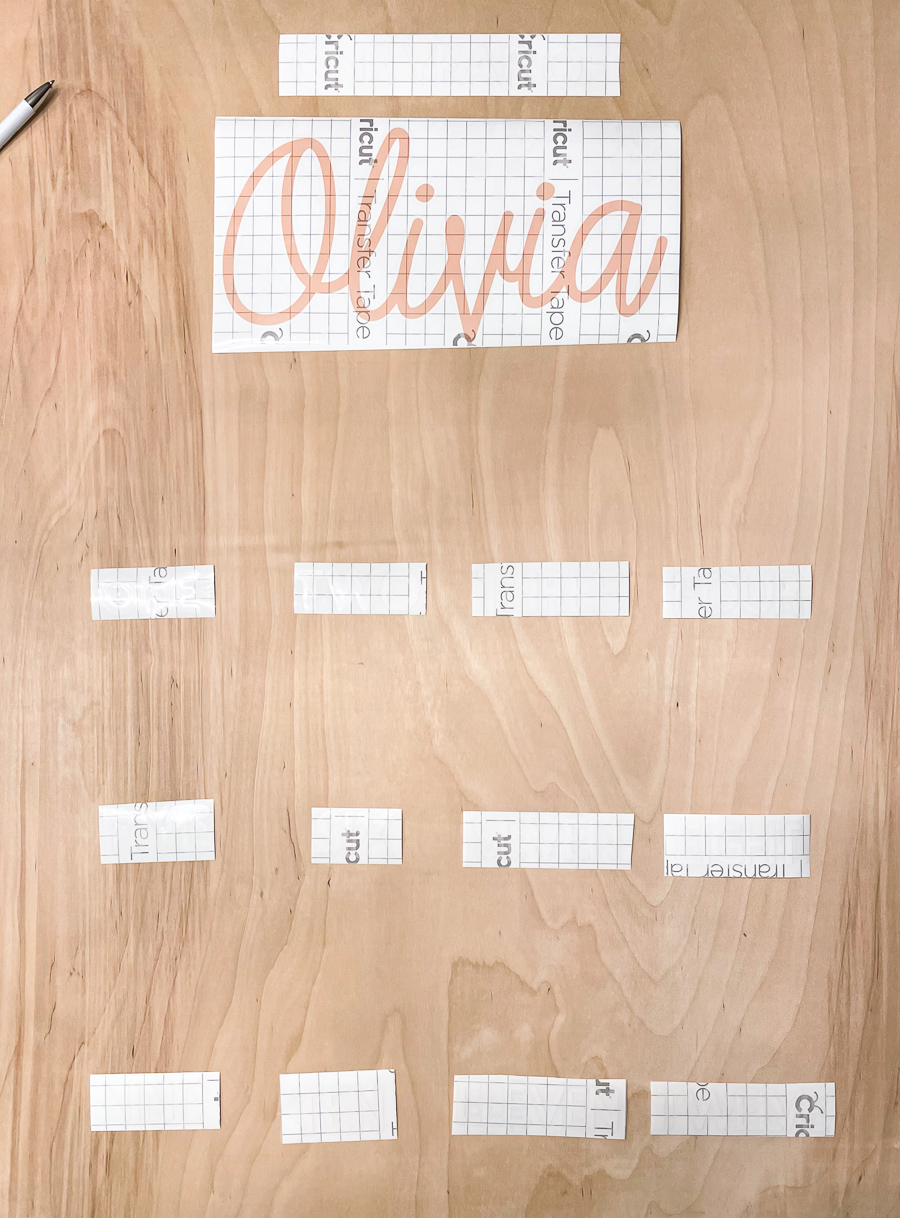
Now that you have your project board, labels and photos ready, it’s time to plan out the layout. With 12 months of photos, I did a 4×3 photo layout. To make sure that everything is straight and aligned, use a pencil and ruler leveler to draw across the board and mark where the photos should be placed. Then plan out where the vinyl labels should go.

Step 4: Apply labels and photos to board
DIY photo board tutorial, one year board for first birthday

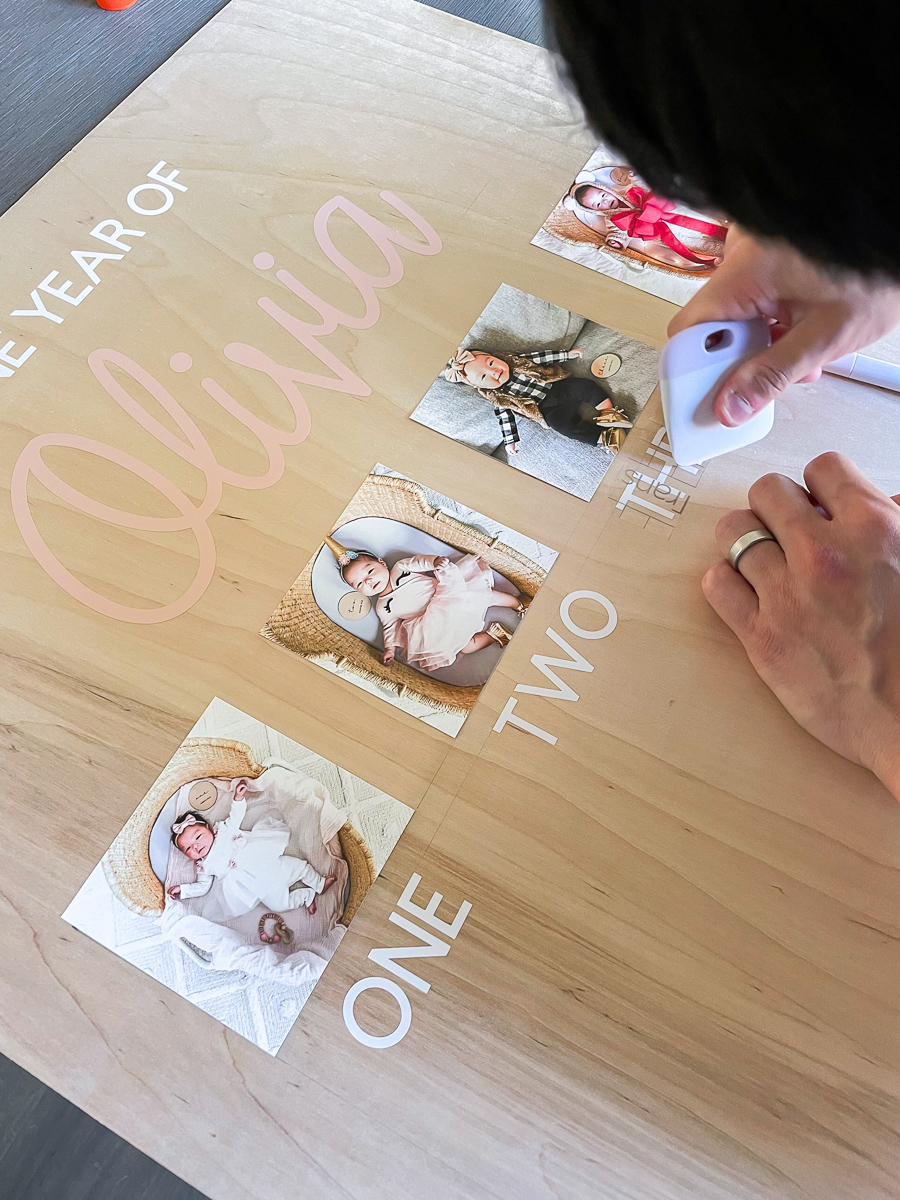
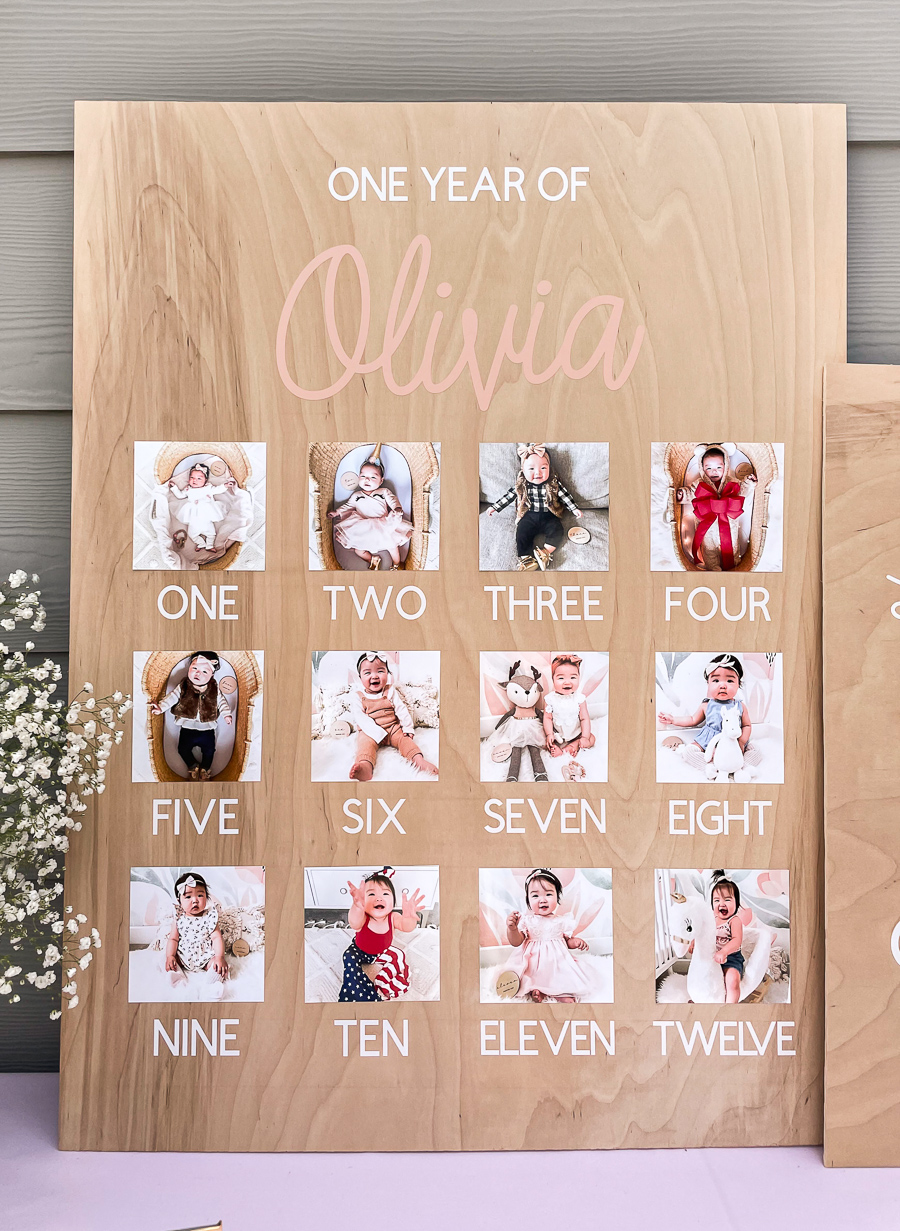
Once you’re ready, use transfer tape to apply the vinyl labels to the project board and glue the photos using Elmer’s glue. TADA! The DIY photo board project is complete and ready for your party!
DIY photo board tutorial, DIY one year old board, 12 months of Olivia one year board, Cricut vinyl DIY project

This photo board was easy to make and was a beautiful and personal piece at her first birthday party. I still have it today and will forever keep it as a memento! I also love seeing her progression within her first year – they grow up so fast!
Share this:

  • Click to share on Twitter (Opens in new window)
  • Click to share on Facebook (Opens in new window)

In: Baby 0-12 months, DIY, Home, Motherhood

don’t miss a post

You’ll Also Love

Small Guest Bedroom Makeover with BEHR Paint
TREE is located in Bellevue and Tacoma, Washington, offering eco friendly and sustainable home decor and home furnishings, made of reclaimed and recycled materials5 Eco Friendly Home Decor Items You Need from TREE
White and Pink Playhouse Makeover

Comments

  1. Rachel says

    April 13, 2022 at 10:22 am

    Such a cute idea! I love a good DIY vs. buying something for a party.

    Reply
  2. Barb says

    October 17, 2022 at 9:44 am

    This is so cute! What size did you make the Cricut letters?

    Reply
    • Tina says

      November 10, 2023 at 9:35 am

      Since I welded the letters, it doesn’t show me the size anymore. But the height for the numbers is about 1in!

      Reply
  3. Allison says

    March 22, 2023 at 10:37 am

    What font did you use on your circuit?

    Reply
    • Tina says

      November 10, 2023 at 9:34 am

      I used Emiline for “Olivia” and Cricut Sans for the numbers!

      Reply
  4. Thi Minh Nguyen says

    January 9, 2024 at 8:39 am

    What is the size of the board after it’s cut?

    Reply
    • Karen Quach says

      August 1, 2024 at 12:50 pm

      Would love to know size of both boards too please.

      Reply
      • Heather Adams says

        September 23, 2024 at 12:08 pm

        I am wondering the same. Did you figure this out? 🙂

        Reply

Leave a Reply Cancel reply

Your email address will not be published. Required fields are marked *

I accept the Privacy Policy

This site uses Akismet to reduce spam. Learn how your comment data is processed.

Next Post >

Olivia’s First Birthday Boba Party Theme

Welcome to Just A Tina Bit, a Seattle-based lifestyle blog specifically tailored to millennial working moms. Whether it's being a first time mom, juggling a career in tech, styling and organizing your home, or having fun with DIY projects, I'm here to share all my experiences and hacks so that you can make life just a little bit easier!

Shop My Instagram

Where I Shop for Fashion

Amazon
Asos
Banana Republic
J.Crew
LOFT
Madewell
Nordstrom
Nordstrom Rack
Old Navy
Revolve
Shopbop
Target

Where I Shop for Home Decor

Amazon
Anthropologie
CB2
Crate & Barrel
Etsy
HomeGoods
Marshalls
Minted
Pottery Barn
Pottery Barn Kids
Serena & Lily
Target
Wayfair
West Elm
World Market

Search by Keyword

instagram

Follow @justatinabit

Jeff’s office just got a new upgrade! 🤩 I got Jeff’s office just got a new upgrade! 🤩 I got him the new @tcl_usa F8D Fire TV cause a guy cant have too many screens 😂 This TV uses QLED technology and has 4K Ultra HD resolution and is available exclusively on Amazon. Comment SHOP for a link to everything! #tclpartner
Did you know you can just…trace onto canvases?! Did you know you can just…trace onto canvases?! 🎨 I was soo close to spending $8 per character canvas on Etsy until I learned that I could transfer printed designs onto blank canvases myself!

Between me and Jeff, we traced 30 Hello Kitty canvases in under two hours while watching Married at First Sight Seattle 😂 It was actually kinda fun and saved us $200!

Comment SHOP and I’ll send you the transfer paper and canvases I used + easy DIY instructions ❤️ #canvaspaintings #kidspartyideas #kidscraft
Had to share one last recap of my parents’ 50th Had to share one last recap of my parents’ 50th wedding anniversary party because that clip of them dancing and my dad dancing with my daughters will forever be one of my favorite memories 🥹

My parents fled Vietnam in 1975 after the war ended. When they arrived in Washington to meet their sponsors, my dad happened to see my mom and aunt at the airport struggling and not knowing any English. He stepped in to help them then pursued my mom for the next six months. They got married shortly after in 1976 and the rest is history!

As recent refugees starting over in a new country, they didn’t have much money, so they had a small, simple wedding. That’s why I knew I wanted to make their 50th anniversary party extra special and give them the beautiful celebration they never had. Happy 50th anniversary to my parents!! ❤️🥂 #50years #anniversaryparty
DIY MARQUEE SIGN! 💡 This is my second time buyi DIY MARQUEE SIGN! 💡 This is my second time buying this kit and it’s so easy to make this marquee sign, just snap and hot glue! You can choose any number or letter for your party. This is the 3-foot option. Comment SHOP for the link! #amazonfind #marqueenumbers
AMAZON HOSTING HACK 🤍 To get the draped table l AMAZON HOSTING HACK 🤍 To get the draped table look, use these backdrop curtain drapes! I’ve already washed them and they came out looking clean and new still. Excited to use them for an actual backdrop too. Comment SHOP for the exact link! #hostinghack #tablesettingideas
My favorite part of decorating for a party is putt My favorite part of decorating for a party is putting together the table setting! This one turned out so elegant and timeless 🤩🤍 I’ll share what I used for the draped, pleated look in another video. Comment SHOP for all the links to my parents’ wedding anniversary party decor! #tablesetup #anniversaryparty #tablesettingideas
Party prep for my parents’ 50th wedding annivers Party prep for my parents’ 50th wedding anniversary! 👰🏻‍♀️🤵🏻‍♂️💍 This was such a big milestone that I wanted to go all out for the party decor 🤍 My parents met shortly after coming to America when the Vietnam War ended and got married within 6 months. 50 years later and here we are 🥹 If you want any decor links, just comment SHOP!  #weddinganniversary
Can’t believe we installed this pergola ourselve Can’t believe we installed this pergola ourselves! We have a friend that paid $1500 to get it installed so we were afraid it was going to be a lot of work. But it was pretty straightforward and everything came packaged nicely and organized. We finished the pergola itself in 4 hours!

Once we had it bolted down by our concrete guy, we added the accessories. Should I fully enclose this @miradoroutdoor pergola with two more pull down screens on the sides?! Comment SHOP for the pergola link and use code TINA05 for an extra 5% off! #pergola #miradorpergola #moretoenjoy
BACKYARD MAKEOVER PART 3! We made it to the final BACKYARD MAKEOVER PART 3! We made it to the final reveal! We ripped up some muddy grass, poured concrete, dug up and moved our irrigation system, planted a ton of trees and hydrangeas, and put up a new pergola. This project was 1.5 months in the making and it feels amazing to be finished. We are already hanging out here so much more and the concrete really makes the space more usable.

If you’re looking for my @miradoroutdoor pergola, it’s is currently 30% off for early Labor Day weekend sale and you can use my code TINA05 for an extra 5% off 🤍 Comment SHOP for all the links and I hope you enjoyed this backyard makeover series! #backyardproject #miradorpergola #moretoenjoy #outdoorpatio
BACKYARD MAKEOVER PART 2! After pouring concrete, BACKYARD MAKEOVER PART 2! After pouring concrete, I wanted to soften it up with lots of new plants. But before we could do that, our entire sprinkler system had to be dug up and rerouted! The backyard was crazy messy for weeks.

Once we were able to plant, we went from 0 plants to 18 emerald green trees and 32 hydrangeas and they made the biggest difference! I knew nothing about plants before and now I learned so much about hydrangeas. Come back for Part 3, the final reveal! #backyardmakeover #backyarddesign

GET TO KNOW ME

About
Contact
FAQ

search

CATEGORIES

Lifestyle
Home Decor
Motherhood
Fashion
  • Copyright Notice
  • Affiliate Disclosure

Copyright © 2026 Just A Tina Bit · Theme by 17th Avenue