My favorite part of decorating for a party is putt My favorite part of decorating for a party is putting together the table setting! This one turned out so elegant and timeless 🤩🤍 I’ll share what I used for the draped, pleated look in another video. Comment SHOP for all the links to my parents’ wedding anniversary party decor! #tablesetup #anniversaryparty #tablesettingideas
Party prep for my parents’ 50th wedding annivers Party prep for my parents’ 50th wedding anniversary! 👰🏻‍♀️🤵🏻‍♂️💍 This was such a big milestone that I wanted to go all out for the party decor 🤍 My parents met shortly after coming to America when the Vietnam War ended and got married within 6 months. 50 years later and here we are 🥹 If you want any decor links, just comment SHOP!  #weddinganniversary
Can’t believe we installed this pergola ourselve Can’t believe we installed this pergola ourselves! We have a friend that paid $1500 to get it installed so we were afraid it was going to be a lot of work. But it was pretty straightforward and everything came packaged nicely and organized. We finished the pergola itself in 4 hours!

Once we had it bolted down by our concrete guy, we added the accessories. Should I fully enclose this @miradoroutdoor pergola with two more pull down screens on the sides?! Comment SHOP for the pergola link and use code TINA05 for an extra 5% off! #pergola #miradorpergola #moretoenjoy
BACKYARD MAKEOVER PART 3! We made it to the final BACKYARD MAKEOVER PART 3! We made it to the final reveal! We ripped up some muddy grass, poured concrete, dug up and moved our irrigation system, planted a ton of trees and hydrangeas, and put up a new pergola. This project was 1.5 months in the making and it feels amazing to be finished. We are already hanging out here so much more and the concrete really makes the space more usable.

If you’re looking for my @miradoroutdoor pergola, it’s is currently 30% off for early Labor Day weekend sale and you can use my code TINA05 for an extra 5% off 🤍 Comment SHOP for all the links and I hope you enjoyed this backyard makeover series! #backyardproject #miradorpergola #moretoenjoy #outdoorpatio
BACKYARD MAKEOVER PART 2! After pouring concrete, BACKYARD MAKEOVER PART 2! After pouring concrete, I wanted to soften it up with lots of new plants. But before we could do that, our entire sprinkler system had to be dug up and rerouted! The backyard was crazy messy for weeks.

Once we were able to plant, we went from 0 plants to 18 emerald green trees and 32 hydrangeas and they made the biggest difference! I knew nothing about plants before and now I learned so much about hydrangeas. Come back for Part 3, the final reveal! #backyardmakeover #backyarddesign
BACKYARD MAKEOVER PART 1! We’ve been wanting to BACKYARD MAKEOVER PART 1! We’ve been wanting to redo our backyard for years. One designer suggested pea gravel while another suggested pavers and turf. And while I liked both designs, why didn’t anyone mention pouring concrete?! It’s so much more affordable and cut the cost by half! Come back for part ✌🏻 #concretepour #concretepatio #backyardmakeover
MARGARITA BAR CART! 🌸🍹🍓🍋✨ I love set MARGARITA BAR CART! 🌸🍹🍓🍋✨ I love setting up  a self-serve drink bar so guests can make their drink however they’d like. This one was a hit! Comment SHOP and I’ll send you links to everything. Bottoms up! #magaritas #drinkstation #barcart
#ad Easy, cold lunch ideas! 🥪✨ My formula is #ad Easy, cold lunch ideas! 🥪✨ My formula is to do a main, fresh fruit, veggie, savory snack and a little treat. I got all of the groceries, lunchbox supplies and back-to-school stuff from @fredmeyerstores!! #FredMeyer #FredMeyerPartner #backtoschool #lunchboxideas
PANTRY ORGANIZATION! Comment SHOP for all the cont PANTRY ORGANIZATION! Comment SHOP for all the containers and organizing links! 🛒✨

This pantry was STRESSING me out! I finally took everything out, tossed so many expired items, and grouped everything by category. The best part is that I barely bought any new containers!

Here’s what I did differently:
• Low-profile baskets for small snacks: I can actually see everything now instead of digging through big baskets of random snacks.
• Less decanting: I had way too many jars, and transferring everything was extra work for items we barely used.
• Labeled everything: I never really labeled before, which made it way too easy to forget what we had.
• Ditched the rolling can rack: Cans in the back were always getting forgotten so now I use a behind-the-door organizer where I can see everything at once.

I LOVE how this pantry organization turned out, and I’m actually confident we can keep it this way! 🙌🏼 #pantryorganization #kitchenorganizationideas
  • About
  • TikTok
  • My Amazon Page
  • My LTK
  • Lifestyle
    • Beauty + Hair
    • Career + Finance
    • Culture
    • Food + Recipes
    • Travel
    • Wedding
    • All
  • Home
    • DIY
    • Entertain / Parties
    • Home Decor
    • Organization + Cleaning
    • All
  • Motherhood
    • Maternity Outfits
    • Pregnancy + Postpartum
    • Baby 0-12 months
    • Toddler
    • All
  • Fashion
    • Fall / Winter Oufits
    • Spring / Summer Outfits
    • Maternity Outfits
    • All
  • Shop + Links
    • My Instagram / TikTok
    • My Amazon Page
    • My Home
    • My Favorite Retailers
  • Contact
    • About
    • Contact Me
    • FAQ

Just A Tina Bit

A Seattle Lifestyle Blog

  • Lifestyle
    • Beauty + Hair
    • Career + Finance
    • Culture
    • Food + Recipes
    • Travel
    • Wedding
    • All
  • Home
    • DIY
    • Entertain / Parties
    • Home Decor
    • Organization + Cleaning
    • All
  • Motherhood
    • Maternity Outfits
    • Pregnancy + Postpartum
    • Baby 0-12 months
    • Toddler
    • All
  • Fashion
    • Fall / Winter Oufits
    • Spring / Summer Outfits
    • Maternity Outfits
    • All
  • Shop + Links
    • My Instagram / TikTok
    • My Amazon Page
    • My Home
    • My Favorite Retailers
  • Contact
    • About
    • Contact Me
    • FAQ

DIY, Home, Lifestyle, Wedding · March 22, 2020

DIY All White Wagon

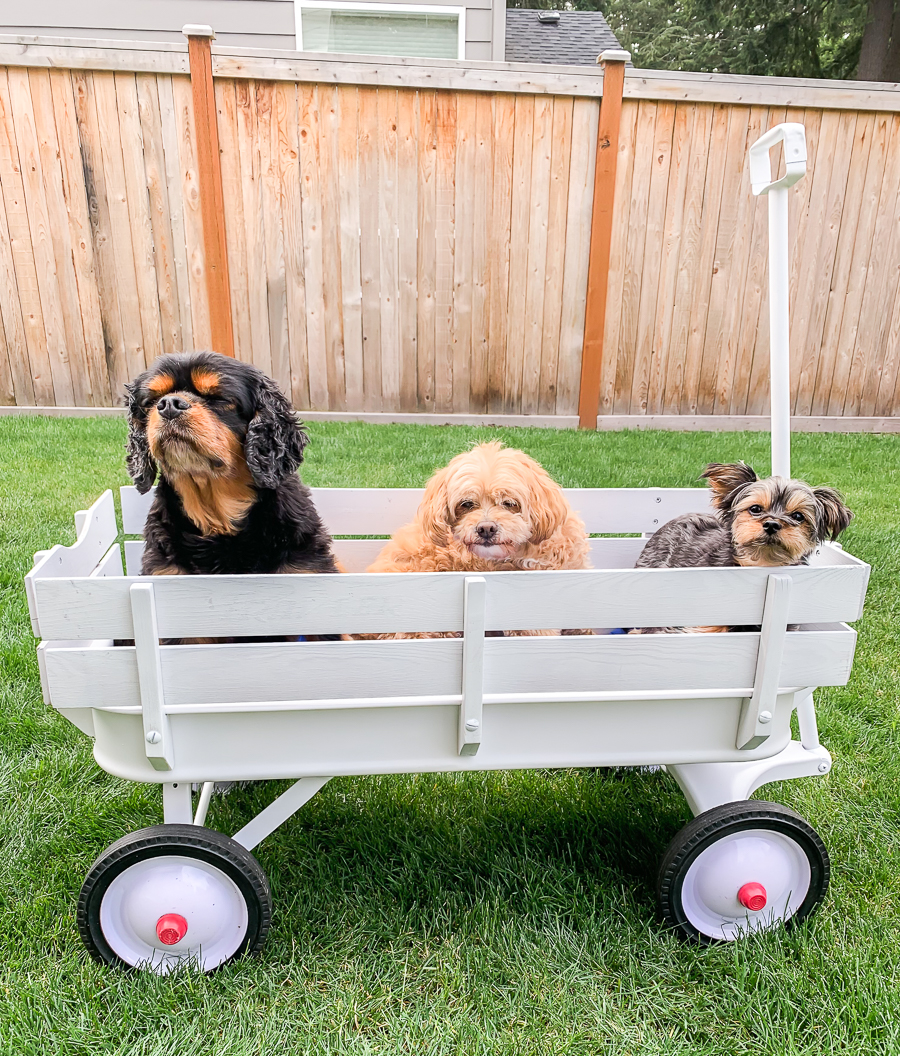
Today’s project is how we transformed a red Radio Flyer wagon into a beautiful all white wagon in 5 easy steps! We did this so that our three fur babies could be pulled down the wedding aisle!

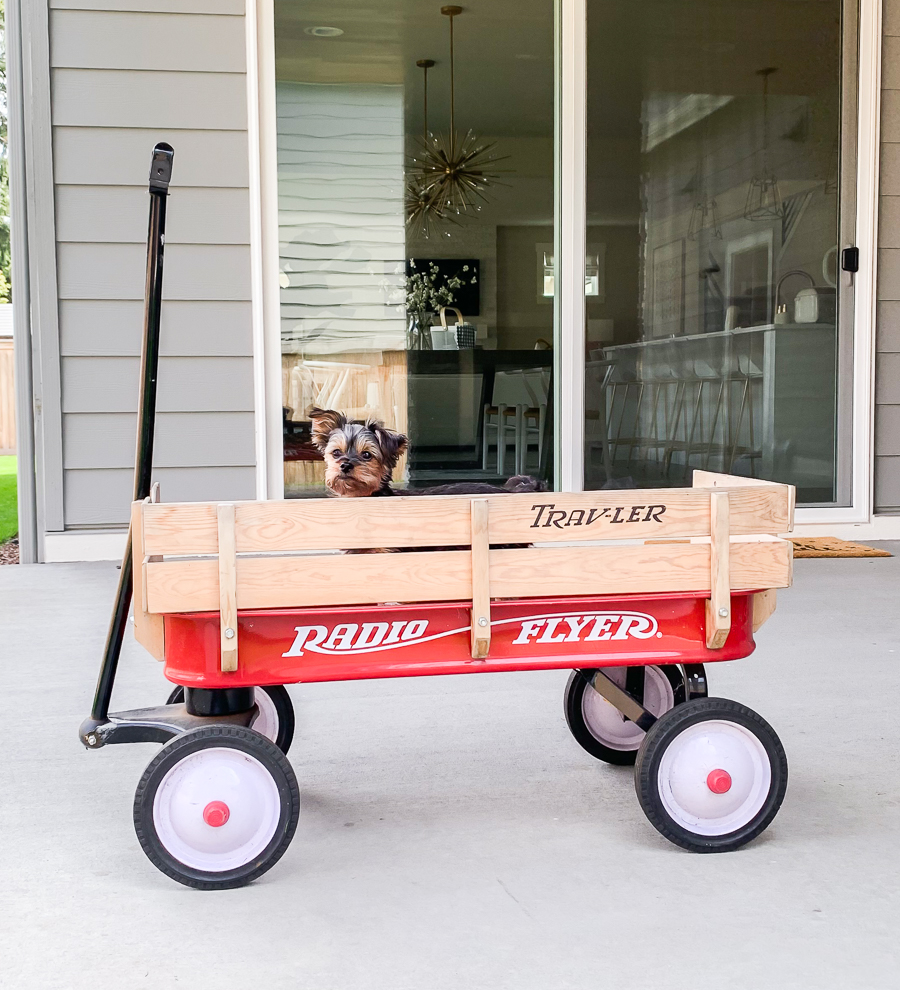
If you look for white wagons on sites such as Etsy they go for $200-$500. Insane right?! Because we were having such a hard time finding a nice and affordable one, we decided to go the DIY route. We started off with a classic, used red Radio Flyer wagon that we found for $30 on Facebook Marketplace. You can also try OfferUp and Craigslist (a brand new one retails for at least $100). Read on for detailed instructions on how to DIY an all white wagon!
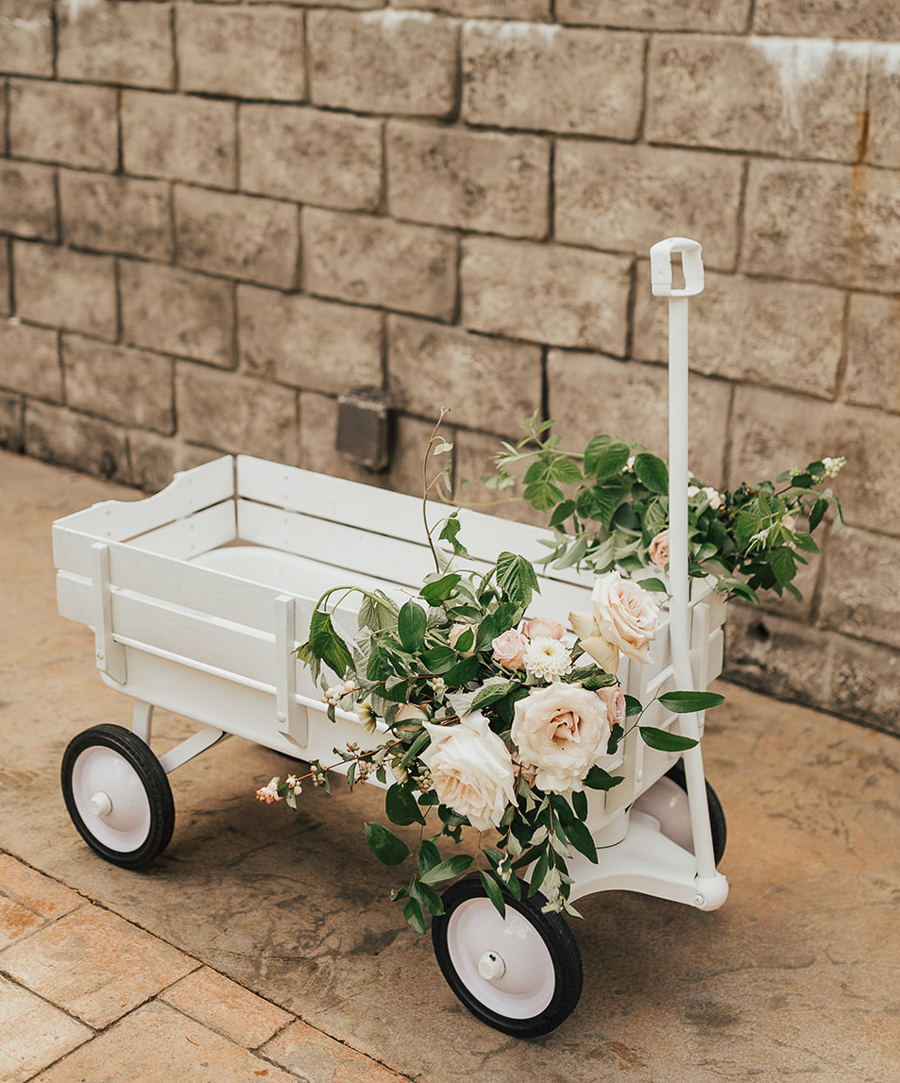
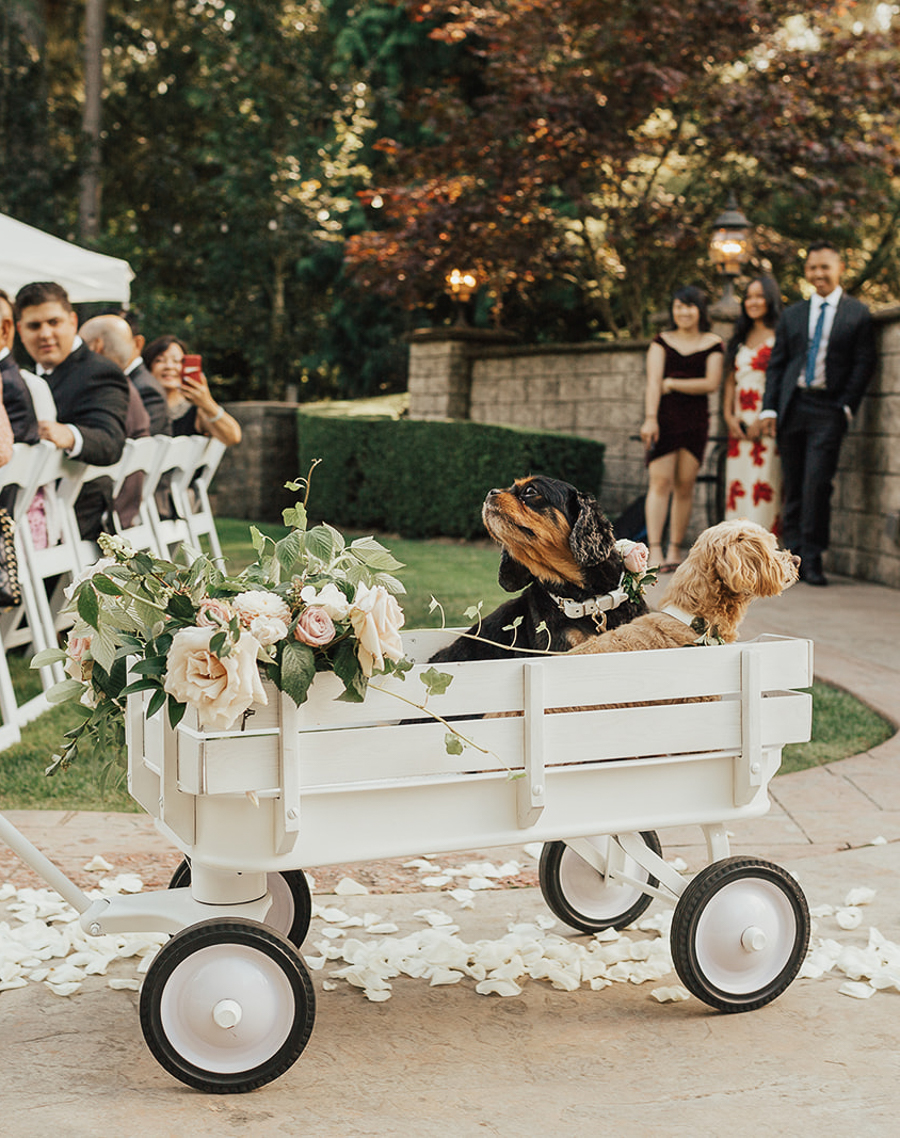
DIY project spray paint Radio Flyer wagon all white, white wagon, wedding wagon with flowers, flower wagon, wedding dog wagon

What You’ll Need:

  • Radio Flyer Wagon (we bought a used one for $30 – check Facebook Marketplace, OfferUp, Craigslist, etc.)
  • Water hose and cloth for cleaning
  • Spray paint (we used this one in Gloss White)
  • Newspaper, cardboard, or paint drop cloth to lay wagon parts on
  • 4 plastic bags to wrap wheels
  • Flat-head screwdriver to take apart the wagon
  • Gloves for protection

STEP 1: Clean the Wagon

If you got a brand new Radio Flyer Wagon, you can skip this step. But since we got ours off of Facebook Marketplace for only $30, it was dirty and needed some major cleaning.

First, remove the 4 wooden panels and then hose everything (including the wooden panels) down with water. Use a cloth immediately after to thoroughly dry the wagon and prevent the metal from rusting. Let all parts completely dry over night.
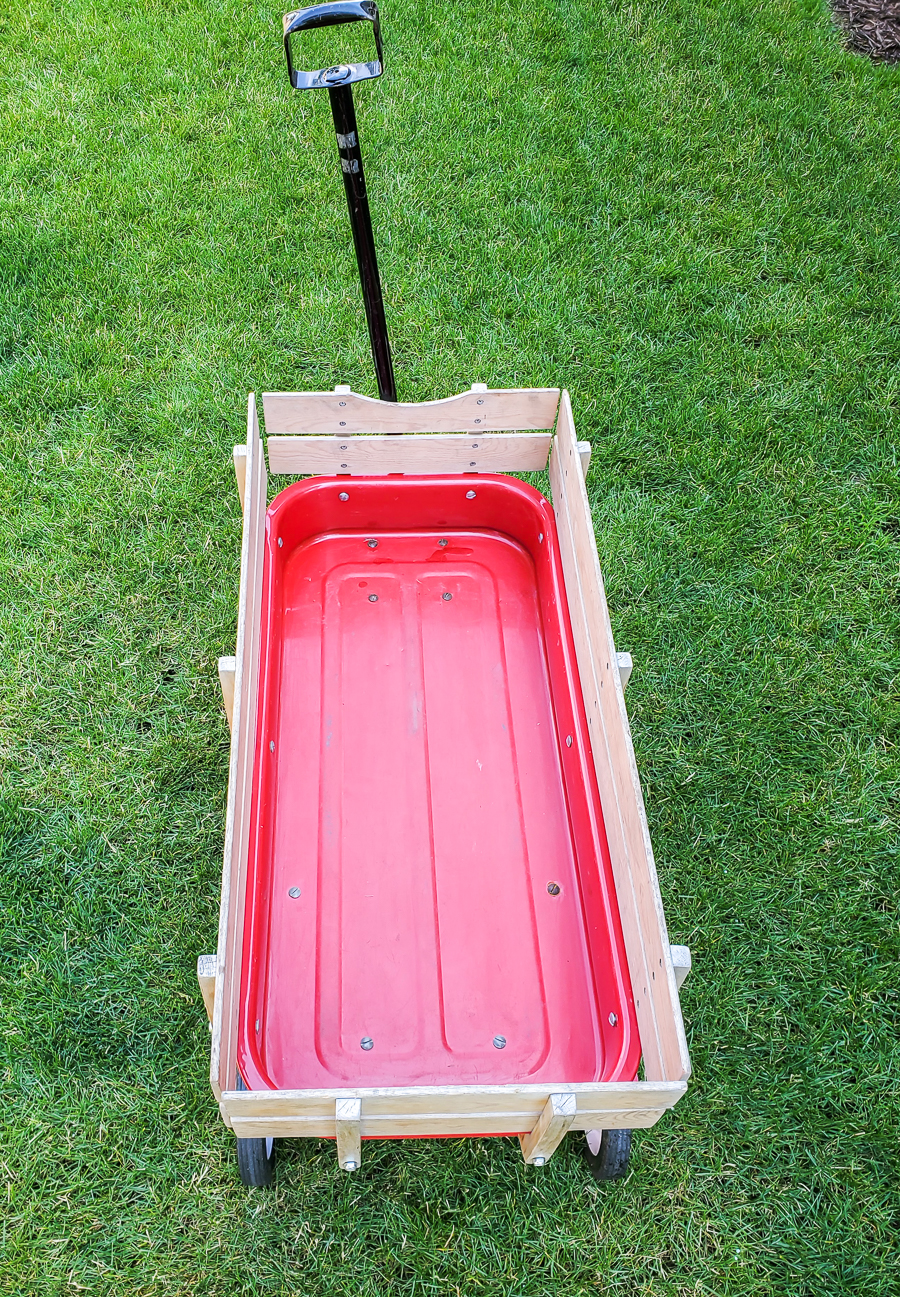
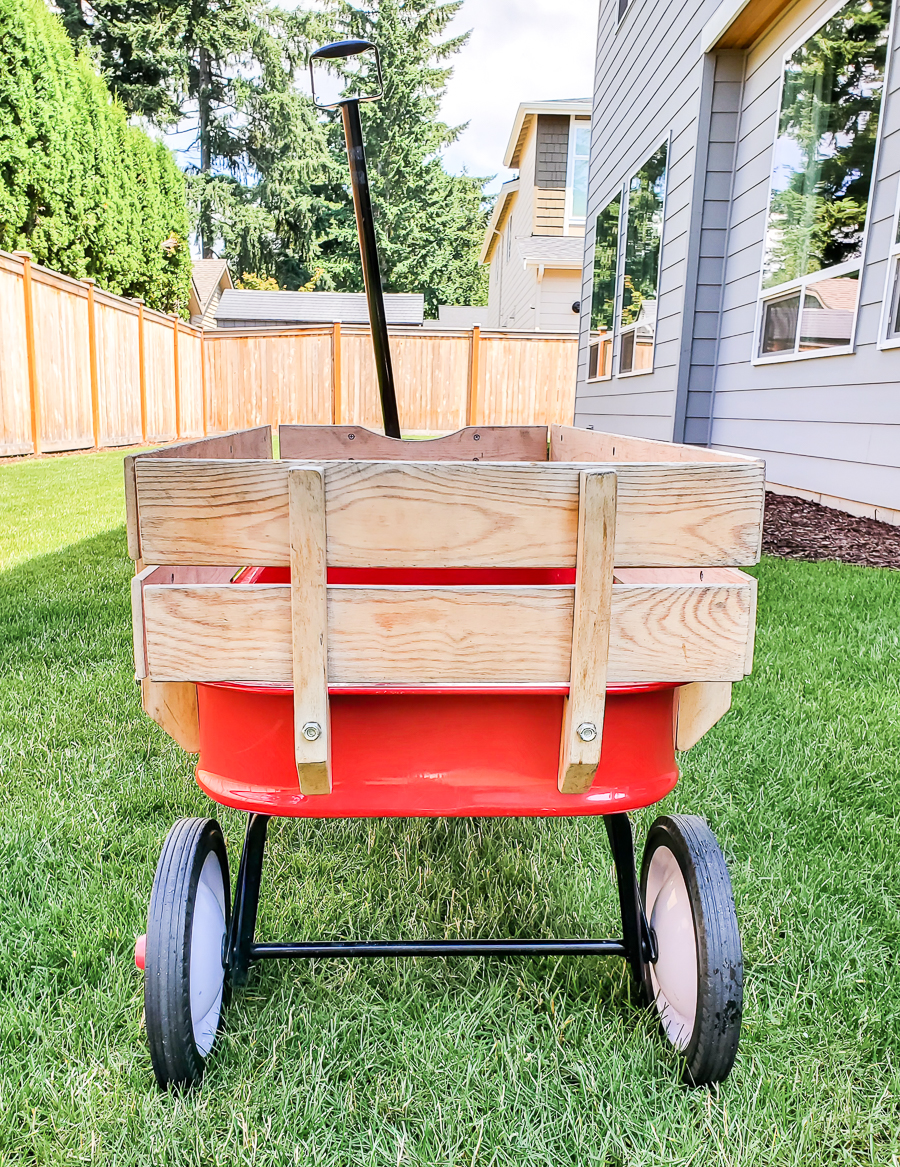
Red Radio Flyer wagon

STEP 2: Dissemble

Use a flat-head screwdriver to fully take apart the wagon. You’ll end up with:

  • 4 wooden panels
  • 1 red wagon metal base
  • 4 red wheel caps
  • 1 metal part attached to the back two wheels
  • 1 metal part attached to the wagon handle and front two wheels
  • Lots of screws – be sure to not lose any!

STEP 3: Spray Paint

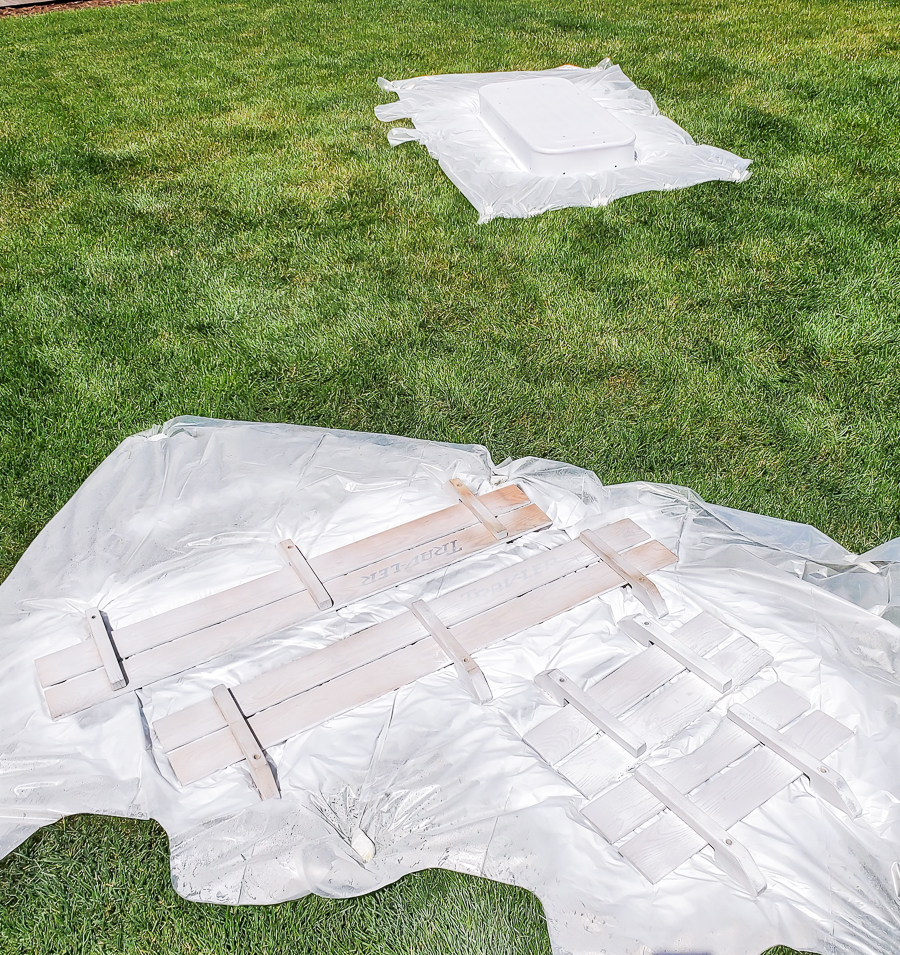
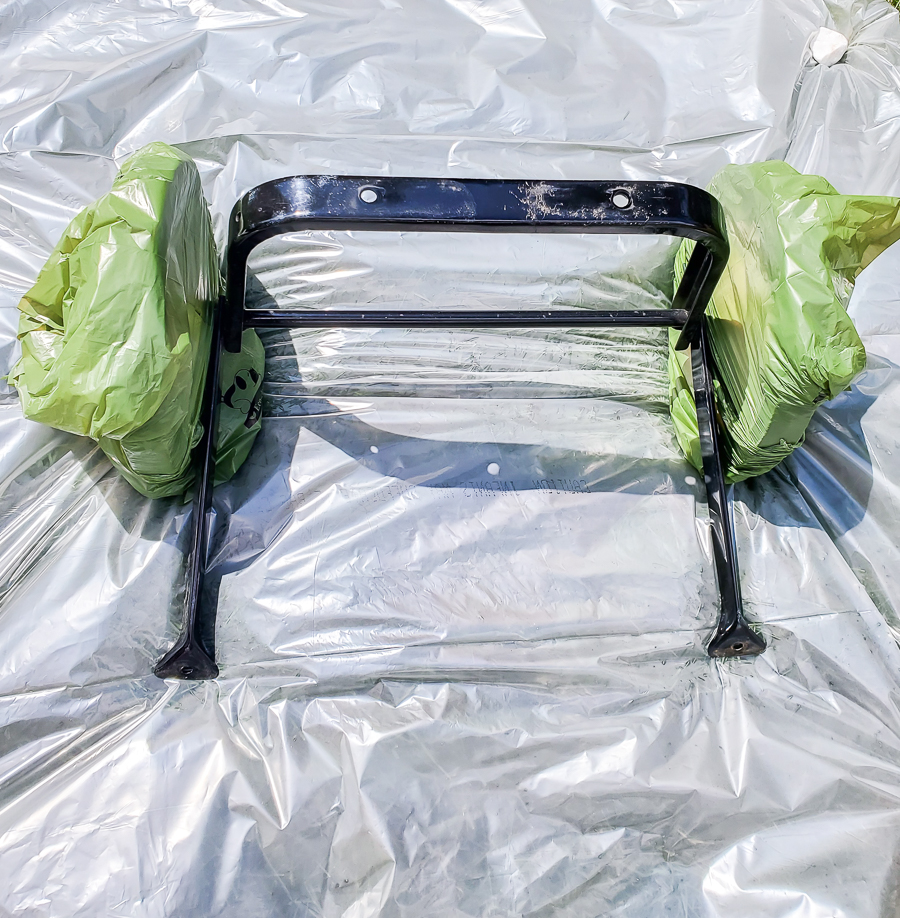
Lay down all wagon parts listed in Step 2 on newspaper, cardboard or paint drop cloth. Pro tip: Do NOT use plastic. We made this mistake (as seen in the photos below) and noticed that the spray paint would stick to the plastic and took longer to dry.

Put gloves on for protection and spray paint the first layer of each wagon part on one side. For tips on how to spray paint correctly, watch this YouTube video. Let the first layer dry completely. Flip over the wagon parts and spray paint the other side. Repeat on each side until the layers thoroughly cover the base color or logo. Let dry completely in between each layer.

Don’t forget to spray paint the screws for a complete all white wagon look.
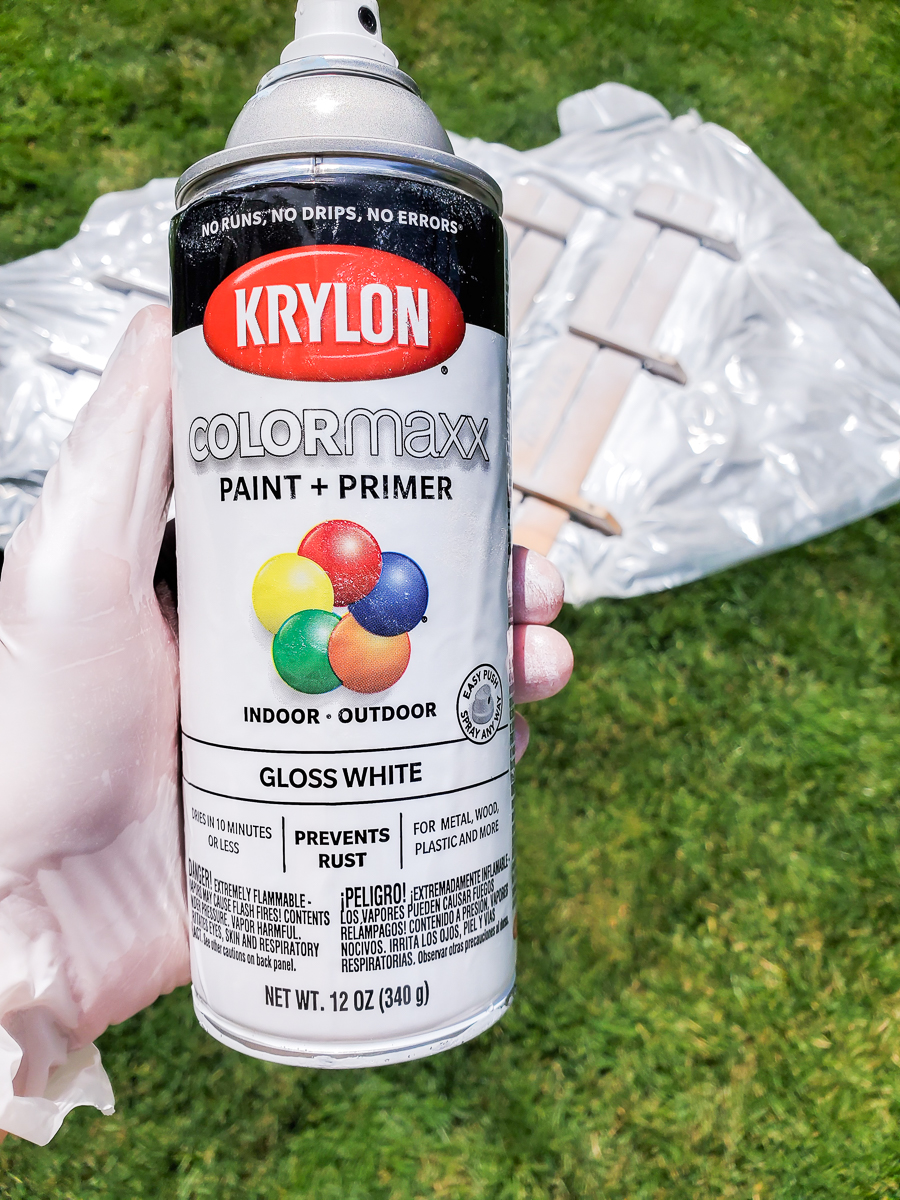
DIY project spray paint Radio Flyer wagon all white, white wagon, wedding wagon with flowers, flower wagon, wedding dog wagon, Krylon Colormaxx Paint + Primer Gloss White spray paint

For the metal parts attached to the wheels, use plastic bags to wrap the 4 wheels before you spray paint.
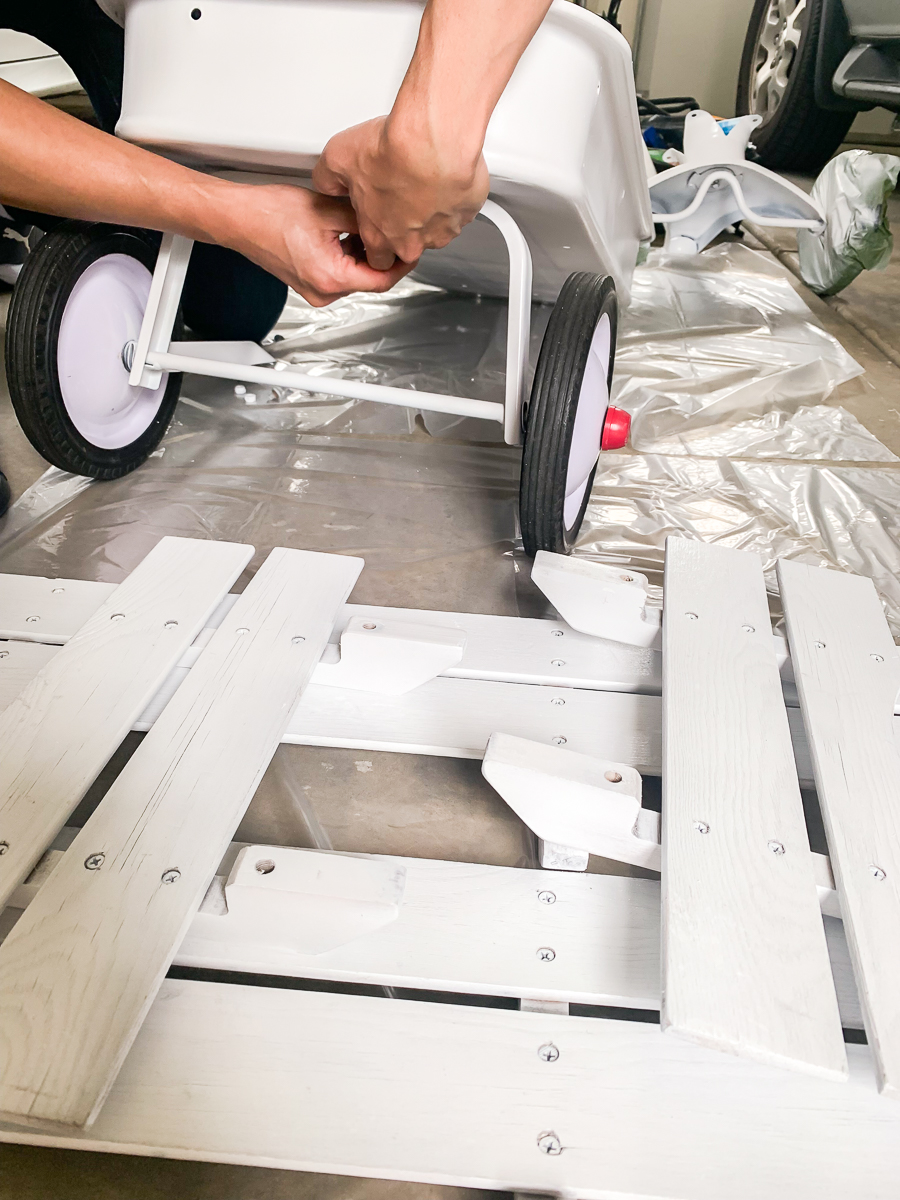
STEP 4: Reassemble White Wagon

Once the spray paint is dry, reassemble the wagon and you’re done!
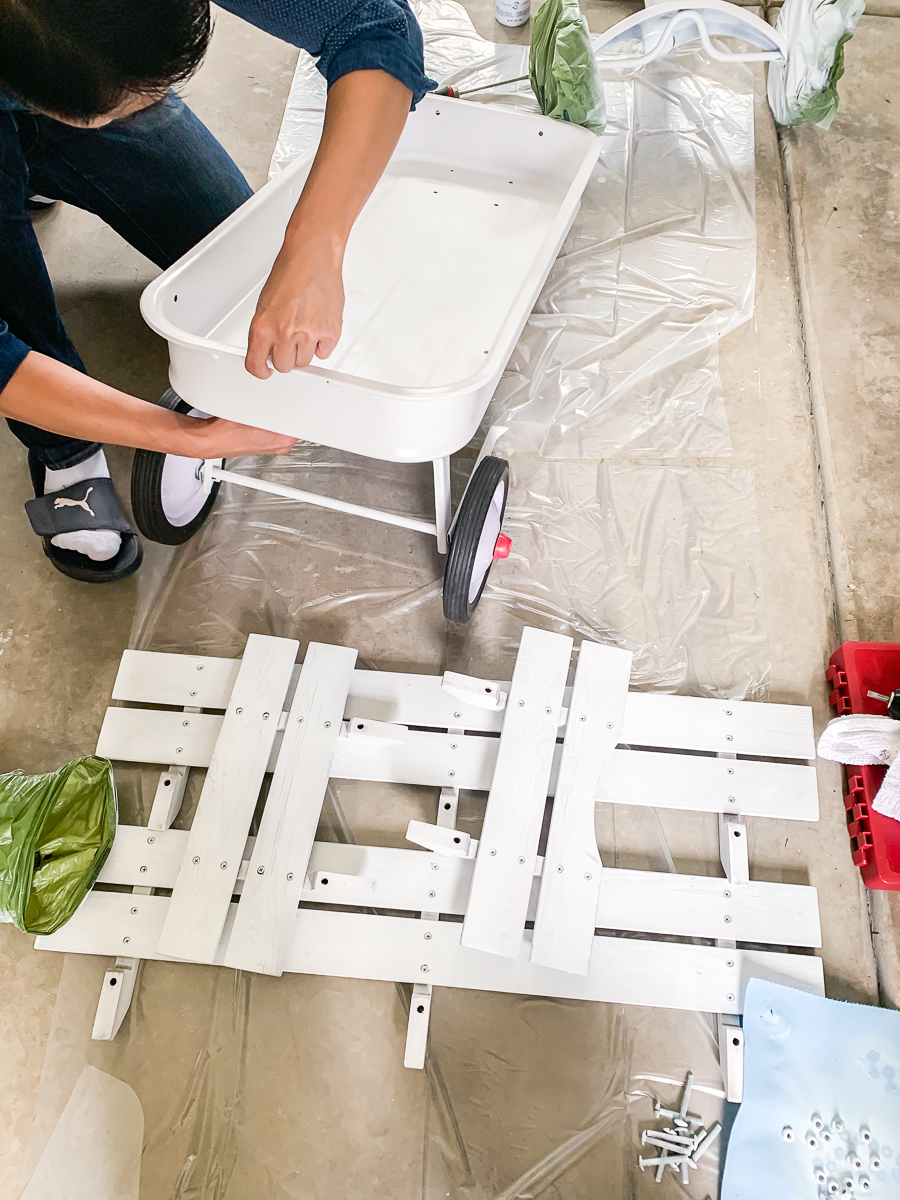
DIY project spray paint Radio Flyer wagon all white, white wagon, wedding wagon with flowers, flower wagon, wedding dog wagon

STEP 5: Decorate, if you want!

Our wedding florist, Stephanie Roseanne Design, decorated the white wagon with fresh flower arrangements for our big day. If you’re down for another DIY project, you can also buy faux flowers and create your own arrangement! Photos below are by our wedding photographers Sam and Sola Lee Photography and you can see more wedding pictures in our wedding recap post!
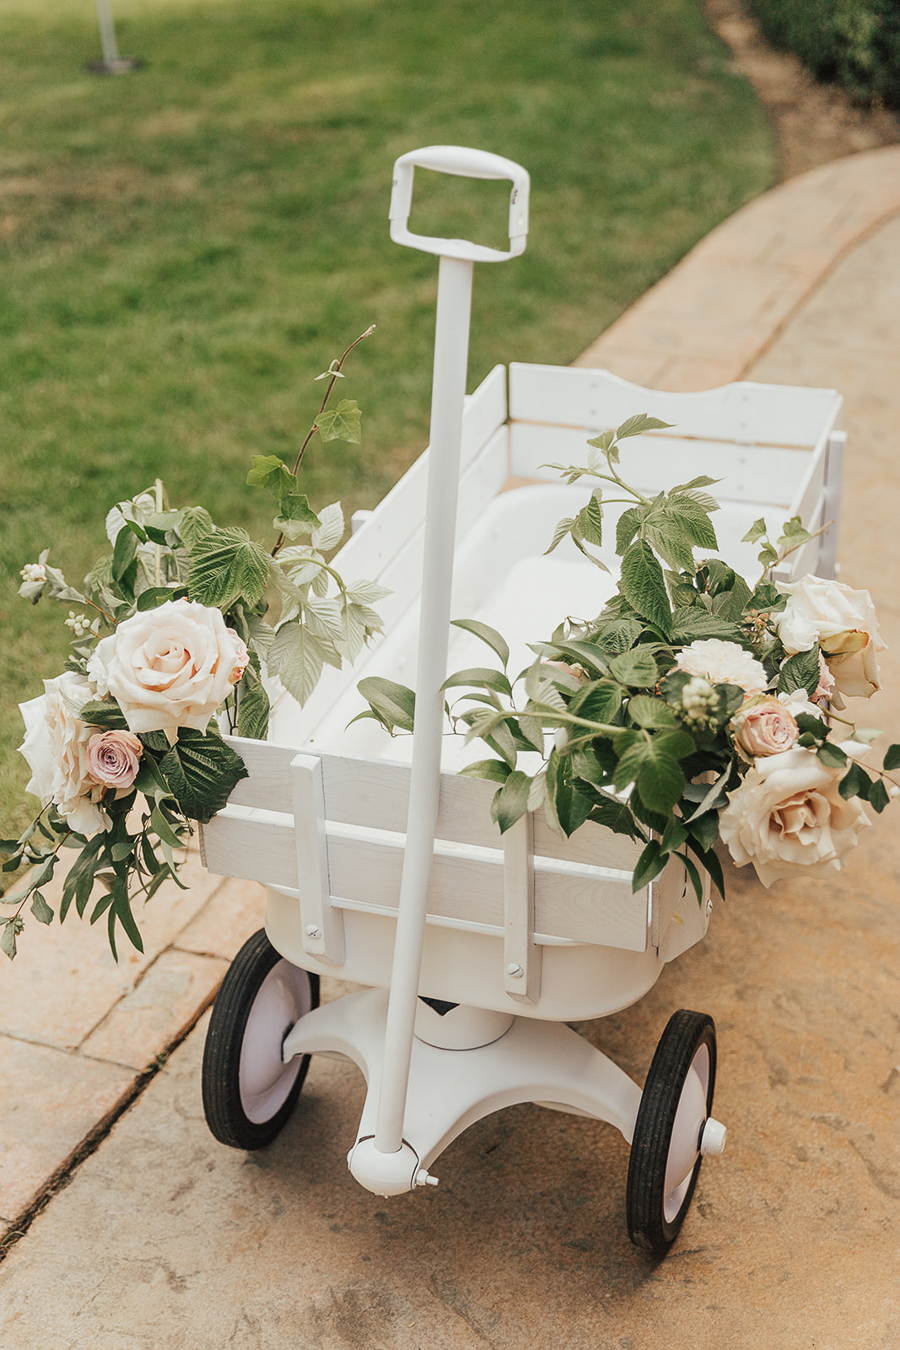
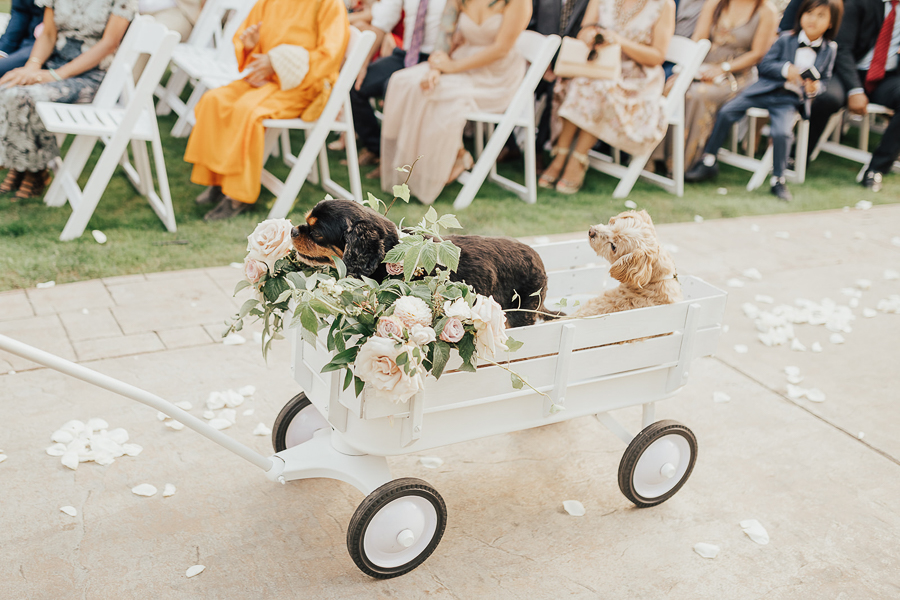
DIY project spray paint Radio Flyer wagon all white, white wagon, wedding wagon with flowers, flower wagon, wedding dog wagon

SHOP THIS POST

Radio Flyer Wagon | Spray Paint | Flat-head Screwdriver

Share this:

  • Click to share on Twitter (Opens in new window)
  • Click to share on Facebook (Opens in new window)

In: DIY, Home, Lifestyle, Wedding

don’t miss a post

You’ll Also Love

Modern Holiday Tablescape
Traditional Vietnamese tea ceremony wedding, Vietnamese American, modern ao dai for women and men, Seattle fashion blogger, white wedding ao dai, Washington State Capitol wedding photosVietnamese Wedding Ao Dai Bridal Portraits
DIY donut wall, wedding donut wall, DIY project, Seattle garden wedding, how to make a donut wall, extra large donut wall, donut wall decor, a hole new beginning wedding donut pun, cake cutting donut wall backdrop, Seattle blogger Just A Tina Bit weddingDIY Wedding Donut Wall

Comments

  1. Michelle Joseph says

    March 23, 2020 at 2:06 am

    I think DIY is a great way to fill the time during this pandemic. The wagon turned out great!

    Mich x

    Reply
  2. Jennifer says

    March 23, 2020 at 5:05 am

    This is such a cute idea!!

    Jennifer
    Effortlessly Sophisticated

    Reply
  3. Jessica says

    April 3, 2020 at 11:53 pm

    Oh wow, this is so adorable dear! Great DIY project!

    Jessica | notjessfashion.com

    Reply
  4. Kathrine Eldridge says

    April 4, 2020 at 4:27 am

    What a cute DIY for a wedding! Thanks for sharing. You did an amazing job!

    https://www.kathrineeldridge.com

    Reply
  5. Makeup Muddle says

    April 4, 2020 at 7:19 am

    Oh my gosh I cannot believe how cute that little wagon is! Those beautiful doggies look so happy to have everyone looking at them, they are adorable! I can’t believe you made that, it’s so so good! xo

    Makeup Muddle

    Reply
  6. Allie Mackin says

    April 4, 2020 at 11:36 am

    WOW, how awesome is this! I love it, turned out lovely and it had bought this like this it would have been over $100. $30 way to go!!

    Allie of
    http://www.allienyc.com

    Reply
  7. Helena Primeira says

    April 4, 2020 at 4:50 pm

    So cute, I liked 🙂

    XoXo
    – Helena Primeira
    – Helena Primeira Youtube
    – Primeira Panos

    Reply
  8. Anha says

    April 5, 2020 at 5:10 am

    Amazing DIY. Thanks.

    xoxo

    A.
    https://www.eikomania.com

    Reply
  9. Ashley says

    April 7, 2020 at 10:28 am

    Literally the cutest thing ever- and you guys nailed this DIY!

    -Ashley
    Le Stylo Rouge

    Reply
  10. Andreea says

    April 7, 2020 at 2:50 pm

    Wooow, the result is really spectacular! I totally love it! DIY projects are really fun to try during this pandemic.
    Thank you so much for sharing!

    xo, Andreea | https://www.budistyle.com/en

    Reply
  11. Christine Kong says

    April 8, 2020 at 2:29 pm

    I love this! It is so much cuter like that. Now I wish I still had my Radio Flyer wagon from when the kids were little. This is so cute and what a fab idea!

    xoxo,
    Christine
    http://dailykongfidence.com/

    Reply
  12. DeLinda Harrington says

    April 4, 2024 at 7:49 am

    How did you attach the flowers?

    Reply
    • Tina says

      July 10, 2024 at 9:03 am

      My florist did it but you could probably use zipties or ribbon.

      Reply

Leave a Reply Cancel reply

Your email address will not be published. Required fields are marked *

I accept the Privacy Policy

This site uses Akismet to reduce spam. Learn how your comment data is processed.

Next Post >

Pregnancy Announcement + Answering First Trimester Questions

Welcome to Just A Tina Bit, a Seattle-based lifestyle blog specifically tailored to millennial working moms. Whether it's being a first time mom, juggling a career in tech, styling and organizing your home, or having fun with DIY projects, I'm here to share all my experiences and hacks so that you can make life just a little bit easier!

Shop My Instagram

Where I Shop for Fashion

Amazon
Asos
Banana Republic
J.Crew
LOFT
Madewell
Nordstrom
Nordstrom Rack
Old Navy
Revolve
Shopbop
Target

Where I Shop for Home Decor

Amazon
Anthropologie
CB2
Crate & Barrel
Etsy
HomeGoods
Marshalls
Minted
Pottery Barn
Pottery Barn Kids
Serena & Lily
Target
Wayfair
West Elm
World Market

Search by Keyword

instagram

Follow @justatinabit

My favorite part of decorating for a party is putt My favorite part of decorating for a party is putting together the table setting! This one turned out so elegant and timeless 🤩🤍 I’ll share what I used for the draped, pleated look in another video. Comment SHOP for all the links to my parents’ wedding anniversary party decor! #tablesetup #anniversaryparty #tablesettingideas
Party prep for my parents’ 50th wedding annivers Party prep for my parents’ 50th wedding anniversary! 👰🏻‍♀️🤵🏻‍♂️💍 This was such a big milestone that I wanted to go all out for the party decor 🤍 My parents met shortly after coming to America when the Vietnam War ended and got married within 6 months. 50 years later and here we are 🥹 If you want any decor links, just comment SHOP!  #weddinganniversary
Can’t believe we installed this pergola ourselve Can’t believe we installed this pergola ourselves! We have a friend that paid $1500 to get it installed so we were afraid it was going to be a lot of work. But it was pretty straightforward and everything came packaged nicely and organized. We finished the pergola itself in 4 hours!

Once we had it bolted down by our concrete guy, we added the accessories. Should I fully enclose this @miradoroutdoor pergola with two more pull down screens on the sides?! Comment SHOP for the pergola link and use code TINA05 for an extra 5% off! #pergola #miradorpergola #moretoenjoy
BACKYARD MAKEOVER PART 3! We made it to the final BACKYARD MAKEOVER PART 3! We made it to the final reveal! We ripped up some muddy grass, poured concrete, dug up and moved our irrigation system, planted a ton of trees and hydrangeas, and put up a new pergola. This project was 1.5 months in the making and it feels amazing to be finished. We are already hanging out here so much more and the concrete really makes the space more usable.

If you’re looking for my @miradoroutdoor pergola, it’s is currently 30% off for early Labor Day weekend sale and you can use my code TINA05 for an extra 5% off 🤍 Comment SHOP for all the links and I hope you enjoyed this backyard makeover series! #backyardproject #miradorpergola #moretoenjoy #outdoorpatio
BACKYARD MAKEOVER PART 2! After pouring concrete, BACKYARD MAKEOVER PART 2! After pouring concrete, I wanted to soften it up with lots of new plants. But before we could do that, our entire sprinkler system had to be dug up and rerouted! The backyard was crazy messy for weeks.

Once we were able to plant, we went from 0 plants to 18 emerald green trees and 32 hydrangeas and they made the biggest difference! I knew nothing about plants before and now I learned so much about hydrangeas. Come back for Part 3, the final reveal! #backyardmakeover #backyarddesign
BACKYARD MAKEOVER PART 1! We’ve been wanting to BACKYARD MAKEOVER PART 1! We’ve been wanting to redo our backyard for years. One designer suggested pea gravel while another suggested pavers and turf. And while I liked both designs, why didn’t anyone mention pouring concrete?! It’s so much more affordable and cut the cost by half! Come back for part ✌🏻 #concretepour #concretepatio #backyardmakeover
MARGARITA BAR CART! 🌸🍹🍓🍋✨ I love set MARGARITA BAR CART! 🌸🍹🍓🍋✨ I love setting up  a self-serve drink bar so guests can make their drink however they’d like. This one was a hit! Comment SHOP and I’ll send you links to everything. Bottoms up! #magaritas #drinkstation #barcart
#ad Easy, cold lunch ideas! 🥪✨ My formula is #ad Easy, cold lunch ideas! 🥪✨ My formula is to do a main, fresh fruit, veggie, savory snack and a little treat. I got all of the groceries, lunchbox supplies and back-to-school stuff from @fredmeyerstores!! #FredMeyer #FredMeyerPartner #backtoschool #lunchboxideas
PANTRY ORGANIZATION! Comment SHOP for all the cont PANTRY ORGANIZATION! Comment SHOP for all the containers and organizing links! 🛒✨

This pantry was STRESSING me out! I finally took everything out, tossed so many expired items, and grouped everything by category. The best part is that I barely bought any new containers!

Here’s what I did differently:
• Low-profile baskets for small snacks: I can actually see everything now instead of digging through big baskets of random snacks.
• Less decanting: I had way too many jars, and transferring everything was extra work for items we barely used.
• Labeled everything: I never really labeled before, which made it way too easy to forget what we had.
• Ditched the rolling can rack: Cans in the back were always getting forgotten so now I use a behind-the-door organizer where I can see everything at once.

I LOVE how this pantry organization turned out, and I’m actually confident we can keep it this way! 🙌🏼 #pantryorganization #kitchenorganizationideas
POTS & PANS ORGANIZATION! 🍳✨ We got rid of so POTS & PANS ORGANIZATION! 🍳✨ We got rid of so many pots and pans and switched to using stainless steel only (inspired by one of you!). It was definitely a learning curve, but I feel so good about the change!

With fewer cookware, it made sense to move everything into the cabinet under the stove. This pots and pans organizer has kept them upright, organized, and easy to grab. Comment SHOP for links! #potsandpans #kitchenorganization

GET TO KNOW ME

About
Contact
FAQ

search

CATEGORIES

Lifestyle
Home Decor
Motherhood
Fashion
  • Copyright Notice
  • Affiliate Disclosure

Copyright © 2026 Just A Tina Bit · Theme by 17th Avenue